From your admin dashboard, locate the menu on the left side. Select “Organization,” then navigate to “Recruitment Tools,” and click on “Website Widget: Events.”
Next, press the "+ Create Widget" button to begin the setup process.
1. Configure Widget Content
On the "Generate Widget" page, you can define what events your widget will display:
-
Widget Name: Use this field to give your widget a descriptive name (e.g., "Homepage Events," "Youth Program Widget"). This helps you and other admins easily identify where and how each specific widget is being used.
-
Select Events to Show:
-
All Events: Choose this option if you want the widget to display all published events from your organization.
-
Event Program(s): Select this if you wish to display only events that belong to specific event programs. You can choose one or more programs from the list.
-
-
Select Event Type(s) to Display: Configure which type of event visibility you want to show:
-
Public Only: Displays only events marked as public.
-
Private Only: Displays only events marked as private (volunteers would need to be logged in to see these if restricted by other privacy settings).
-
Both Options: Displays both public and private events.
-
2. Customize Widget Design & User Filters
This section allows you to tailor the appearance and filtering capabilities for your volunteers:
-
Allow users to filter events: You can enable various filters to help volunteers find relevant events. You can configure any combination of these filters:
-
Show causes filter: Allows users to filter events by cause categories.
-
Show programs filter: Enables filtering by event programs.
-
Search events by name: Provides a search bar for events.
-
Note: By default, the event widget will also display options for users to search events by date and location, providing essential filtering capabilities.
-
-
Select the number of events to display on a page: Choose how many events appear per page in your widget view (options include 3, 6, 9, or 12 events).

3. Set Up Event View & Tile Settings
Control how individual events and the overall display are presented within your widget:
-
Set up Event View: You can choose various display layouts for your events. These view options will be presented as a switcher for users:
-
Grid view: Events displayed in a responsive grid format.
-
List view: Events displayed as a vertical list.
-
Calendar view: Events shown on a calendar.
-
Note: You can choose any combination of these views and set any order for how they appear in the swiper.
-
Choose Grid Event Tile Settings: When using the Grid view, you can select specific details to display on each event tile. This helps volunteers quickly grasp key information:
-
End date
-
Day of the week
-
Start time
-
Shifts number
-
Event location
-
Organization logo and name
-
Spots (available/filled)
-
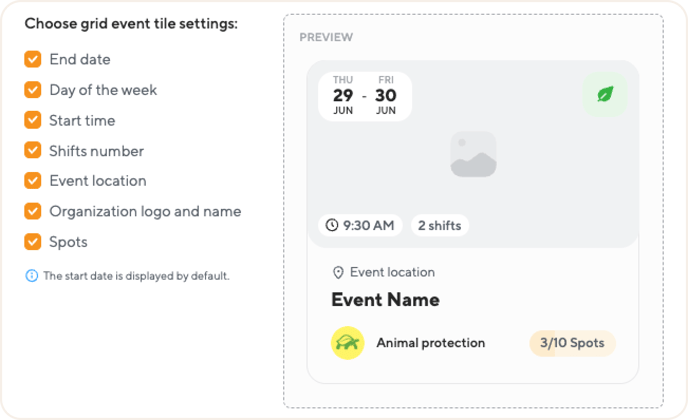
Note: The start date of the event is automatically shown on all grid event tiles. You have the flexibility to select any combination of the available view options.
3. Create Widget
Once you have reviewed and finalized all your settings, simply click the “Generate Widget” button to create your customized event widget.