In this article:
How to filter contacts (see video below):
- Under the "People" tab, go to "Contacts."
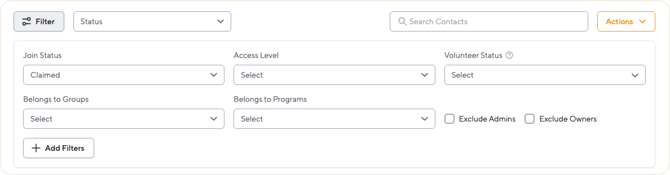
- On the top of the Contacts page, click the Filter button. From there, you can filter by different categories to narrow down your search:
- Join Status
- Access Level
- Volunteer Status
- Belongs to Groups
- Belongs to Programs
- You can also use two quick toggles to clean up your list:
- Exclude Admins removes admin accounts from the results.
- Exclude Owners removes organization owners from the results.
- Once you select the categories you need, only the contact records that match will be displayed on the page.
Add Filters (custom form fields)
Need to filter by something more specific, like a t-shirt size, language skill, or any custom application question? Click + Add Filters to open a list of all custom form fields your organization has created. Pick the field you want, set the value, and the contact list will narrow down accordingly.
How to filter contacts:
How to export contacts (see video below):
The export flow has three main steps: select your contacts → open the export window → choose what data to include.
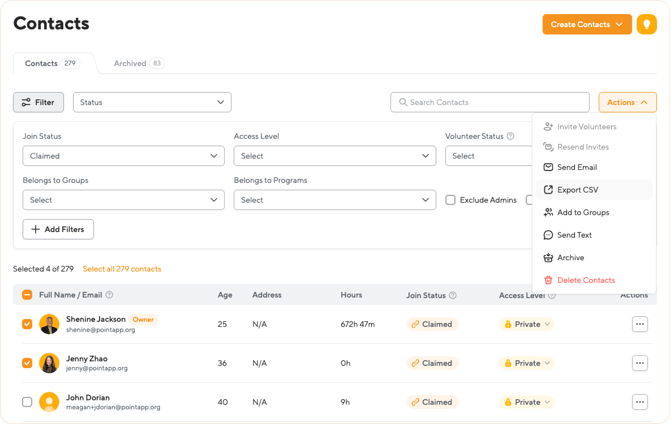
Step 1: Select the contacts you want to export
- Under the People tab, go to Contacts.
- Apply filters or use the search bar to narrow down to the contacts you need (optional — you can also export all contacts at once).
- Use the checkboxes to select specific contacts, or click Select all contacts to include everyone in the filtered view.
Step 2: Open the Export window
- Click the Actions button in the top right.
- From the dropdown, select Export CSV.
- The Export Contact Data popup will open, showing the contacts you selected at the top.
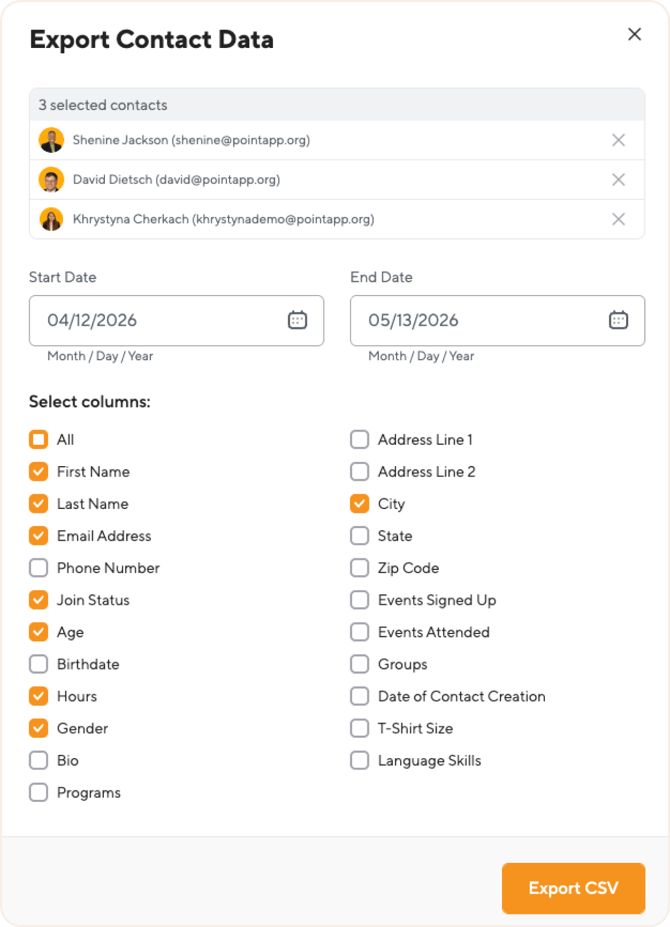
Step 3: Choose what data to include and export
In the Export Contact Data popup:
- Review the selected contacts - listed at the top of the popup. You can remove any contact from the export by clicking the X next to their name.
- Set a date range - choose a Start Date and End Date. This filters time-based fields like Hours, Events Signed Up, and Events Attended to only include data from that period.
- Select the columns you want in your CSV under Select columns. You can pick individual fields or check All to include everything available.
- Click the orange Export CSV button to download the file.
How to export contacts:
Available export fields
When exporting contacts, you can include any combination of these fields:
Basic contact information:
- First Name, Last Name, Email Address, Phone Number
- Address Line 1, Address Line 2, City, State, Zip Code
Demographics:
- Age, Birthdate, Gender
Volunteer activity (time-based - affected by your date range):
- Hours - total hours logged in the selected date range.
- Events Signed Up - events (shifts) the contact registered for.
- Events Attended: events (shifts) the contact actually attended, meaning they have a checked-in status.
Account & status:
- Join Status - Claimed, Pending Request, Invite Send, Unclaimed.
- Date of Contact Creation: when the contact record was created in your organization.
Profile details:
- Groups - groups the contact belongs to.
- Programs - programs the contact is part of.
- Bio - the volunteer's personal bio.
- T-Shirt Size, Language Skills - custom profile fields.
💡 Tip: If you need fields not shown here, like custom form questions or application answers, check out the Pro Reports feature. The Volunteer Details and Hours Report support custom Additional Fields.
Questions? Email us at support@pointapp.org.